Vivarium Construction 102
The 2'nd Part Of The Most Complete Vivarium Building Guide On The Web!
![[!]](structure/importantdot.png) This article pertains to vivariums built using techniques & supplies described in Vivarium Construction 101
This article pertains to vivariums built using techniques & supplies described in Vivarium Construction 101
![[!]](structure/importantdot.png)
Introduction
Contents:
Freshly Planted
Fungus & Mold
Microfauna
Removal of Pests
Cross Contamination
Drainage Layer (Advanced)
Waste Water Sterilization
False Bottoms
Freshly Planted Vivariums
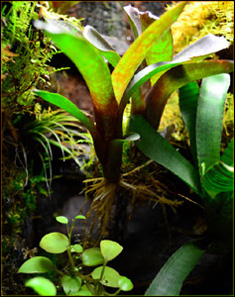

Plant Acclimation
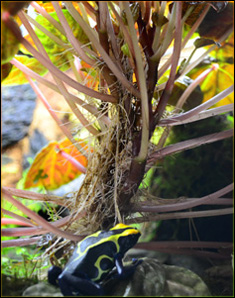

Microfauna Acclimation
During this time, the beneficial microfauna species you introduced will establish themselves with the enclosure as well. It's important to leave them undisturbed during this time by not introducing inhabitants until the 3-6 week mark. Some enthusiasts add very small amounts of Repashy Bug Burger or Morning Wood to freshly planted vivariums, to help isopods & springtails more quickly establish themselves. After 3-4 weeks of acclimation, at least some of the microfauna population should be visible under & inside the layer of leaf litter provided. A healthy microfauna population is a good indicator that a vivarium is ready for inhabitants.Fungus & Mold
Having a little fungus among us isn't always a bad thing!

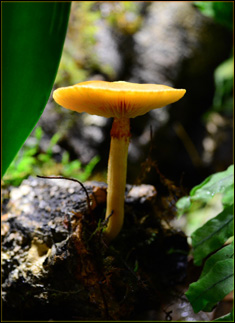

Fungus & Mushrooms
Springtails say a mushroom is a fungi to have dinner with!The vast majority of a vivarium-dwelling fungus's life cycle is spent underground, with mushrooms presenting themselves (in some species) as it's "fruiting body" or reproductive stage. Mushrooms are occasionally present earlier in a vivarium's life, but are usually a little more commonly found as the vivarium ages and the fungus matures. Fungus will most often occur in highly humid environments, and most commonly presents itself on wood or other organic decor. Both fungus and mold play a crucial part in nature's ability to break down, process, and essentially recycle organic waste. In fact, over 90% of all plant species benefit from mycorrhizal relationships. (Mycorrhiza = A symbiotic relationship between the roots of a vascular plant & a fungus.) Naturally forming fungus acts as a food source both above & beneath the substrate layer for Springtails & other beneficial vivarium dwelling detritivores. Pictures of in-vivarium mushrooms are often shared on forums by enthusiasts, as some of the growth patterns can be very interesting. Some hobbyists invest in mushroom spore kits to inoculate wood & other decor items, giving their vivarium a "grown in" look when the mushrooms sprout. Some of these spore kits include bioluminescent species that can look spectacular!
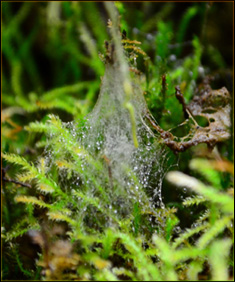

Common Mold
The white "webby" or fuzzy stuffThe most common mold seen in vivariums is white & fuzzy, and is most often prevalent in freshly planted vivaria. (Shown right) We get an email or two about this every once in awhile, but most hobbyists & vivarium builders say, "It's not usually something to be concerned about.". Some hobbyists recommend misting it with water to (usually) make it visually disappear, or you can choose to leave it alone, which will allow you to view the Springtails as they surround & devour it. Try to keep in mind just how natural what you've built is! If left alone, most "new vivarium" mold issues disappear within a couple weeks, as the microfauna devours it while they do their job of keeping the vivarium healthy & properly cycling. In turn, the Springtail population will be able to grow quicker, due to the extra food (i.e. mold) present when the vivarium is initially planted. This initial mold cycle acting as a natural food source for beneficial microfauna is one of the reasons builders let vivariums cycle for at least a month before adding inhabitants.
Excessive Mold
This can be a sign of an underlying issue ranging from something simple, to something serious.If you are seeing excessive mold growth, chances are there may be something inside the vivarium that isn't well suited to the humid environment, and is beginning to break down. This is especially true with grape wood, and many other types of less appropriate vivarium wood (explained in detail on our Vivariums 101 Article). If a certain hard-decor item is causing persistent & unsightly mold, it's careful removal may be necessary. If your substrate has grown mold on it, that can be a serious concern, since appropriate vivarium substrates rarely support this. Using inappropriate vivarium substrate greatly increases the risk of an anaerobic condition, and can cause this & other serious problems. Appropriate vivarium substrates for tropical & temperate vivariums include ABG Mix, NEHERP Vivarium Substrate, similar (tree fern, fir bark, fine charcoal, sphagnum, coir/peat) blends, and other home-made "clay style" substrates. If you are seeing excessive amounts of mold, consider asking someone with experience for help on a vivarium-experienced forum such as Dendroboard.com.
Microfauna
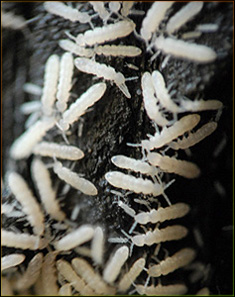
The good, the bad, and the ugly
Everyone who's read into vivariums knows that microfauna (Springtails and Isopods) are a natural, necessary, and extremely beneficial part of the vivarium building process. What about the bugs that nobody talks about? Some beneficial bugs are nearly always present in a vivarium, but aren't often mentioned... We figure a list of commonly seen vivarium microfauna is in order to help people be better prepared for what really happens when you build a live vivarium.
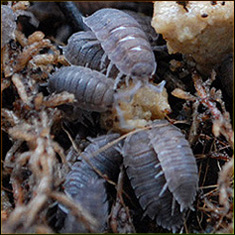
The Good Bugs
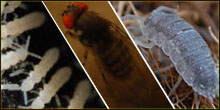
Beneficial Critters that clean up the organic waste inside a vivariumSpringtails and Isopods are the most common types of beneficial vivarium microfauna, and cultures of each are usually introduced to a vivarium upon it's completion. This ensures the bugs will be able to establish a sustainable population within the substrate & leaf litter. Although Springtails & Isopods are the most commonly added beneficial microfauna types, they certainly aren't the only members of the "good bug club".
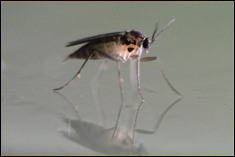
The Neutral Bugs
Bugs that are fairly common, natural, and usually (but not always) go away on their ownFungus Gnats are a small (about 1/8") fairly common and harmless flying insect most commonly seen in more freshly planted vivariums. The larvae are generally beneficial, as they eat decomposing material & fungi, which aids in the decomposition of organic wastes in the vivarium. While healthy plants are generally not negatively affected by these, extremely sensitive new-growth plant roots & seedlings can be damaged by the larvae. Despite that fact, we consider these to be overall neutral, although the Gnats themselves can be irritating. Springtails can/will out-compete the larvae in a well built vivarium, so adding springtails when the enclosure is 1'st built is usually your best bet for control. Allowing the vivarium to acclimate for 3-4+ weeks before introducing herp inhabitants will also help minimize the risks, as the well-established microfauna populations will be more likely to keep up with the added detritus. Common smaller populations of fungus gnats usually die-off with no human effort as Springtails & other beneficial microfauna out-compete them, however occasionally these can establish themselves in the right conditions, and may require a little extra attention. If fungus gnats are introduced to an enclosure before a healthy beneficial microfauna population is established, or with an abundance of detritus, it's much more likely for these to become a pest. In that case, the life cycle can be ended by removing the inhabitant species, and adding Sticky Stakes (or similar non-chemical flying insect trap) for a few weeks to catch the adult Fungus Gnats. The entire life cycle of a fungus gnat is only about 4 weeks, so the problem will resolve itself fairly quickly, upon which time it's safe to remove the Sticky Stakes & re-house the herp in the gnat-free environment. To be clear, these natural decomposers go away naturally (or don't appear at all) the vast majority of the time.
The Bad Bugs
Plant parasites that are very easy to avoid with the proper precautionsThese are the bugs to avoid, as they are detrimental to a vivarium's growth, and some can quickly ruin a beautiful setup. Some of the more common vivarium pests include millipedes, scale insects, slugs, snails, nemerteans, and mealybugs. (Use google images if you are trying to ID a pest, as we didn't have access to any of them for pictures!) While none of these pose a threat to your inhabitant's health directly, larger populations can cause them undue amounts of stress, which can lead to health issues. All the aforementioned species have their own way of being detrimental to the enclosed flora, and can quickly ruin a setup if left unchecked.
The "Ugly" Bugs
Very uncommon, and a little different than the easy-to-prevent bugs on the "bad" list.This is an uncommon household pest that can find it's way into a vivarium; not the other way around. Phorid flies won't arrive with vivarium supplies or any herp-related items, but instead most commonly show up with older kitchen produce, around kitchen garbage, and even from sink drains in your home. We mention these flies mostly for people who work with produce-eating reptiles or insects, as the presence of exposed produce increases the likelihood of encountering Phorid flies in a home. We know of only a couple hobbyists who have ever encountered Phorid flies, but if we're able to help just one hobbyist prevent these in the future, it will have been worth mentioning on this article. These humpbacked flies are about the size of a common fruit fly (D. melanogaster), but their habit of quickly running before they fly (when disturbed) sets them apart & makes them easy to differentiate. If Phorid flies are already present in your living space, they can technically breed inside a vivarium if they are able to find a way inside, so be sure to eliminate all sources of Phorid flies in your home before proceeding with a vivarium build. They aren't directly harmful to inhabitants, but they can be a nuisance. To be clear, these flies are an extremely uncommon risk to simply be aware of moving forward.

Removal Of Pests In-Vivarium
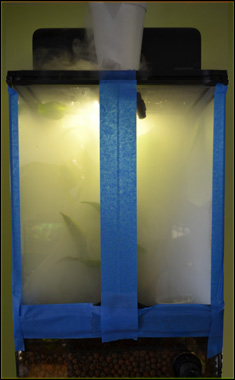

If the preventative measures were skipped during vivarium setup, there's still hope!
If you've already built your vivarium and skipped the industry-standard plant & decor processing procedures, with any luck you might still be OK. However on the off chance that one of the above pests found it's way into your vivarium, there is a fairly simple & inexpensive procedure you can use to rid the enclosure of them. It's called Co2 bombing, and has been popularized by many users of online forums. We need to stress that this procedure can easily be avoided if the proper preventative measures are taken. Co2 bombing is a "last ditch effort" to save a vivarium, and is not considered a standard practice. First, the inhabitants must be removed from the enclosure. Then you'll need to seal the bottom and sides by covering up any gaps, vents, or door jambs with tape (if applicable). After the bottom & sides are well-sealed, simply place some dry ice in a basin of water above the terrarium and allow the Co2 gas it produces (as it evaporates) to flow into, and fill up the vivarium. Be sure that the heavier Co2 gas completely displaces the air in the enclosure. Once it's full of Co2, close/seal the top to keep any drafts in the room from blowing air into the terrarium if possible. Leave the vivarium completely full of Co2 overnight, and repeat the cycle again 2-3 weeks later to remove any pests that were in-egg during the 1'st treatment. Dry ice can usually be purchased from your local ice shop, and should be handled extremely cautiously to avoid burns. Co2 bombing will kill your springtail/isopod population, so restocking your vivarium with them after the last treatment is really the most expensive part of this procedure. The good news is, your vivarium's plants will receive a huge boost from this process, as they thrive on Co2!Cross Contamination
Cross contamination is when pests or pathogens are transferred from one enclosure or animal to the next. This is NOT a vivarium-specific topic, and should be followed with any of your enclosures. There are countless methods to help prevent cross contamination, and any responsible vivarium builder (or exotic animal keeper) should take measures to help minimize the risks. The best practice is to simply limit contact between any item exposed to multiple enclosures without 1'st sterilizing it. This includes your hands, misting bottles, decor, and more. Following anti-cross contamination procedures helps to prevent the possibility of spreading an ailment or plant pest from one enclosure or animal to another. Regardless of how healthy your vivarium and/or inhabitants are; the safest way to think is, "Each vivarium and each inhabitant should be completely separated from any contact with the next". We've put together a quick list of commonly used ways to prevent cross-contamination between live vivaria & your animals. These are all easy methods than anyone can adhere to with very little (if any) cost.Cross Contamination Checklist
A few of the most common & easiest to prevent common instances where cross contamination can occurDrainage Layer - Advanced

A key part of a live vivarium!
It's a whole lot more than just "where the excess water drains to". The drainage layer is home to a population of beneficial bacteria and microfauna, which are both critical to your vivarium's health. Enclosures should always have a shallow water table in the drainage layer to keep humidity at appropriate levels for both the plants & inhabitants. (We recommend a water table depth of 1/2"-3/4" for most enclosures) For many enclosures that are hand-misted, the drainage layer water will not need to be changed or flushed in the vivarium's life. However, the frequent misting required by some species can add too much water to the drainage layer, which can require draining. This is especially true if you'll be using a misting system on your setup, as they can add a considerable amount of water to an enclosure over the course of a few misting sessions. Water from the drainage layer should never rise high enough to come into direct contact with the substrate layer, and ideally should be kept at least 1/2" away from the bottom of the substrate layer. This helps to prevent substrate saturation, which can lead to an anaerobic soil condition.Manual Siphoning To Remove Waste Water
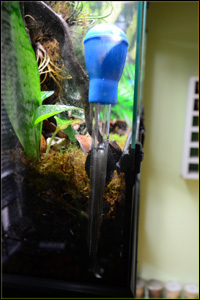
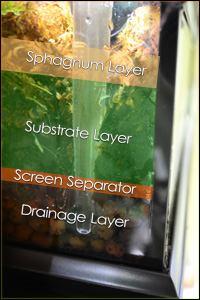
Bulkhead Overflow To Remove Waste Water
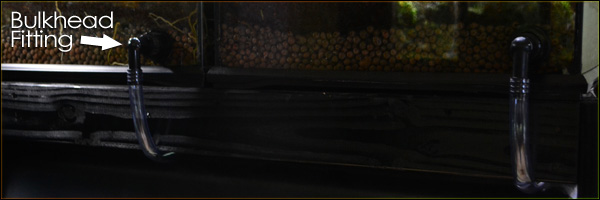
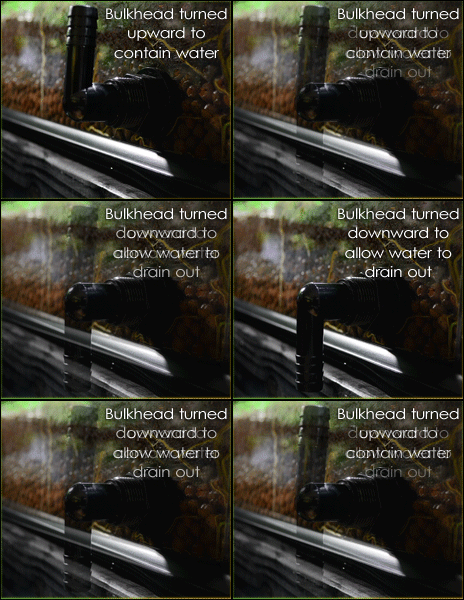
Waste Water Removal - An Eye On Cross Contamination
An example of something that separates good husbandry from great husbandry when using bulkheads for drainage
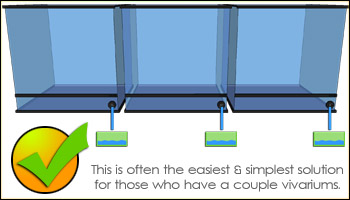
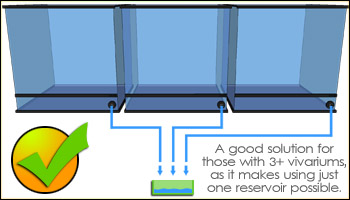
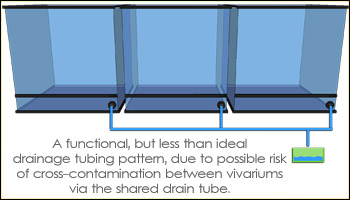
An example of something that separates good husbandry from great husbandry when using bulkheads for drainage
Drainage tubing from one vivarium should not be directly connected from one enclosure to another to eliminate the risk of cross contamination of any possible pathogens. If you have less than a few vivariums, it's often easiest to allow each enclosure to drain to it's own waste water reservoir (see 1'st diagram). If you have a few vivariums, each enclosure's drainage line should drain separately from the next, and they should not come into contact with each other (as illustrated in the 2'nd diagram above). Air gapping drainage as shown can be a little tricky, but once it's set up, it's an excellent peace of mind for you and your vivarium's inhabitants. An air gap drain is when water falls out of a tube or pipe, into a larger waste water reservoir or collection pipe without the two being directly connected. (Thus "air gap") This seemingly trivial gap between the drainage tube & collection pipe (or waste water reservoir, depending on your setup) greatly reduces the risk of direct cross contamination between vivaria by working like a biological one-way valve. A single shared drain tube (3'rd diagram) is less than ideal, due to the increased possible risk of cross-contamination between enclosures.Waste Water Sterilization
Another example of something that separates good husbandry from great husbandry
The most responsible breeders sterilize their wastewater before discarding it. This practice takes another step towards ensuring that your hobby has absolutely no impact on the environment around you. After removing the reservoir from the vicinity of your inhabitants, add bleach (roughly 10% for sterilization, which is 1 1/4 cups per gallon of water) to the reservoir for a few minutes before expelling it. If you have access to germicidal bleach, use it! Considering how quick & easy this step is, it should be considered standard practice for responsible vivarium enthusiasts. Be sure to rinse-out the freshly sterilized container with water before bringing it back near your vivariums.False Bottom vs Standard Drainage Layer
This is an often-debated topic for vivarium builders. False bottoms are an alternative to using a standard drainage layer (with leca, hydroballs, or LDL substrate) which elevates the substrate layer above the water level on a platform which was cut to fit the enclosure. This platform is most commonly made from "egg crate" light diffuser material wrapped with screen, and elevated by PVC fittings. (It could alternatively be propped up using anything that's pH neutral, waterproof, and vivarium safe) Some advantages to using a false bottom style drainage layer include less weight, lower cost, and it arguably makes introducing a water feature easier. Advantages of standard drainage layers include far more surface area for microfauna & beneficial bacteria, the ability to support heavy decor items, and lastly it offers an easy way for microfauna to crawl back up into the soil after going down (or falling down) into the drainage layer. While neither way is "wrong", we believe standard drainage layers are usually the best bet.Red Flags
Here's a list of some common red flag issues that require immediate attention. If you see one of these red flag items in your enclosure, you should address the issue as soon as possible to ensure long-term success in your vivarium & the health of your inhabitants.If your substrate is persistently moldy, it may be due to the use of an improper substrate. Improper substrates for vivarium use include coconut fiber, peat, sphagnum, compost, potting soil, or any mix of these types. All these substrates have a far, far higher risk of compacting in a vivarium than specially blended vivarium substrate, which can lead to a dangerous anaerobic soil condition. If your soil goes anaerobic, it will need to be removed & replaced with an appropriate vivarium substrate. An anaerobic soil condition is considered unsafe for contact with your inhabitants, so they should be removed ASAP. Proper vivarium substrates have all the necessary components to fight compaction long term, support microfauna growth, and stay "airy" enough to support healthy plant life.
Once acclimated, a vivarium should smell like a clean forest, with no unpleasant odors. If you notice a foul odor in your enclosure, chances are either the substrate is anaerobic, or the water in the drainage layer needs to be replaced. Both issues are cause for concern, and can be fixed using information found on this article.
Often a sign of a bug on the "bad list" (above), chewed leaves can be an early sign of an unwanted inhabitant living in your vivarium.


