


Vivarium Tillandsia Care
Processing & Introduction
Before introducing a Tillandsia from any source into your vivarium, we suggest you submerge it in dechlorinated water for a few hours. (No more than 12) This will safely remove any possible microfauna from the plant while rehydrating it from the dry period of shipping. Please note that we don't chemically treat our plants, so heavy processing should not be needed if bought directly from us, but it's always better to be safe than sorry when purchasing from any source.
Misting & Air Circulation
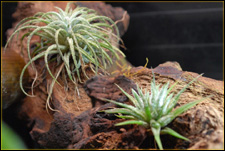
Mounting / Placement
Mounting a Tillandsia where it will stay submerged or even partially submerged in water or substrate will kill it quickly. The best location to mount a Tillandsia is on a background where there's at least some air movement. There are many ways to physically attach the plant to it's permanent location. We personally use hot glue or floral wire most of the time, since those are two of the easiest ways to get it done. With hot glue, just dab some on to where you want the plant to stick and let it cool for a couple seconds, so as not to burn the plant. Then pop the plant's root section onto the glue to hold it in place. Other mounting methods include using toothpicks pushed into backgrounds, or by simply tying them up using orchid monofilament line. Don't surround the base of a Tillandsia with moss, as doing so will hinder the plant's ability to dry off, causing it to rot!
Lighting
To make a long story short, most vivarium plants do best with bright fluorescent or LED bulbs in the 5000-6700K (kelvin) range, illuminated for 12 hours daily. Never put a vivarium in direct sunlight, as doing so will cause the tank's temperature to skyrocket in a very short period of time. Lights should be timed for about 12 hours on & 12 hours off for the best plant growth & a healthy day/night cycle for the inhabitants residing in the vivarium. We have vivarium lighting kits available, if you are looking for a quick, easy, and inexpensive "one click" solution. For more info on vivarium lighting, visit our Vivarium Lighting 101 article.Removing Pups/Offsets
When a Tillandsia reaches maturity, they usually throw offsets or "pups". Pups can be removed when they are at least 1/3-1/2 the size of the mother plant. This can be done by gripping the mother plant by the base and twisting the pup gently downward. It should pop off with little pressure applied. If the pup doesn't want to come off, either wait for it to further mature, or carefully give it a slice as close to it's mother's base as possible. It's important to wait until the pup is large enough to survive on it's own before separating it from it's mother plant.Tillandsia Air Plants
Located In: Bromeliads / Tillandsias