


DIY Incubation
Introduction
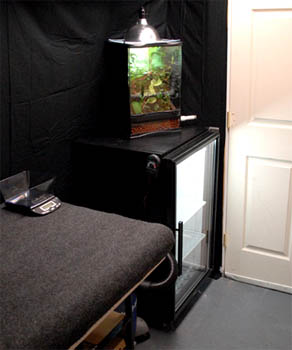
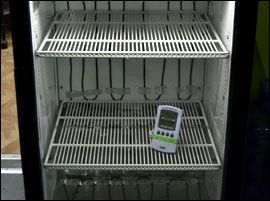
When it comes to breeding Reptiles & Amphibians, a good performing incubator is often one of the most important tools for the process. There are a couple commercially available hobby-specific incubators available, but building your own isn't difficult, and can even offer a few benefits over the store-bought alternatives. For example, some hobbyists working with more than one species of animal may require an incubator that can maintain two different temperatures. Running short on space is another common issue, since the two most popular commercial reptile incubators aren't very large. The expense of buying multiple incubators (either for more space or multiple temperatures/species) can add up quickly, and building your own can help keep overhead costs down for a hobbyist or breeder. In this article, we'll describe how to build your own incubator from start to finish, and discuss the benefits & disadvantages of using certain tools, parts, and techniques. In the example shown, we're using a small commercial refrigerator as the incubation container, but any well insulated container will function equally well at a considerably lower cost.Project Information:
Expected Time Investment: 1-4 Hours, depending on container typeArticle Contents:
Common DIY Incubation Containers
We used a craigslist-sourced commercial glass-door refrigerator in this example, but nearly any well-insulated container can be modified to become an incubator. We've seen clients use food/drink coolers, styrofoam boxes, insulated food shipping containers, wine coolers, and even DIY foam boxes made out of sheets of home insulation boards. This really depends on the space you'll need, so we recommend planning ahead by imagining how many eggs you expect to be incubating at the most during breeding season. The container itself is usually the least expensive part of the project, so building yours a little bigger than you'll probably need won't cost much more (if at all) than building one on the smaller-side. We suggest using a container material that you are comfortable working with. Since our refrigerator example is made of steel, we needed a drill & bit to plumb the heat cable & probes inside. If we had used a styrofoam container, we'd have been fine just using a knife for the same purpose, making the job even easier. Unless you are working with a re-purposed fridge or freezer, no wiring will be necessary, other than plugging the heat source into a thermostat, and the thermostat into a wall.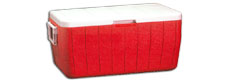
Insulated Food/Drink Coolers
These are nice because so many people have these just lying around, and they are very well insulated. If you've got one available to you, this can shave some of the expense, and they make for a fairly durable & portable solution. Easy to drill through to add a probe & heat source, easy to find, and easy to use. If you are new to the hobby, these are a great way to start incubating eggs on a budget.
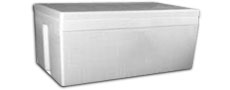
Styrofoam Boxes
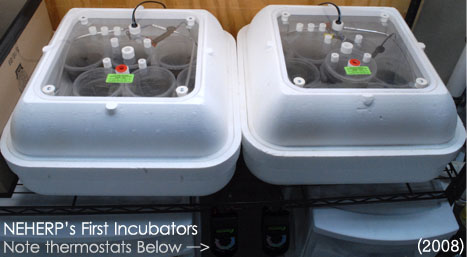
The easiest & least expensive option, if you don't have a large quantity of eggs to incubate. Admittedly, it's not the most professional looking incubator, but we can't think of a more cost effective way to get this job done. Especially for hobbyists expecting just a couple eggs where size isn't an important issue, a simple styrofoam box can be an inexpensive & effective solution.
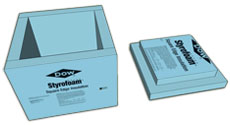
DIY Styro Insulation Container
Making your own incubation container is a little more time consuming than the other options, and may not be for everyone. If you are DIY handy, and the concept of making a 6-sided box doesn't seem daunting, this method does carry the added benefit of being able to build it to specific dimensions which suit your needs. If you have a specific spot for your incubator in mind, it should be as simple as measuring the space you've got, and cutting up styrofoam insulative sheets to create a perfectly-sized box. These foam sheets are available at most home improvement shops for around $20 per a 24"X2"X96" piece, and can be cut-to-size using a sharp knife, razor, or saw. Once cut to size, the pieces can be adhered together using 3" sheetrock screws, and ideally silicone should be used as a glue between sheets for added strength. (Using silicone between sheets & along seams also makes the unit waterproof!) A well-sealing removable top can be made by adhering two styrofoam pieces together, with the smaller to fit the inside diameter, and the larger to fit on the outside diameter. (Shown right) Foam insulation panels are the least expensive option for building a DIY large incubator.

Repurposed Refrigerator / Freezer
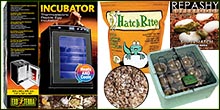
This is the most difficult & expensive option, but it's also the most durable & professional looking. Refrigerators and/or freezers are insulated very well, usually have shelves, and can make excellent incubators. Converting a fridge/freezer into an incubator should only be attempted by adults with DIY experience. Used or non-functional units can usually be sourced for a fair price on Craigslist, local classifieds, or even from an appliance repair shop. Finding a unit already de-pressurized with no compressor is ideal for this purpose, and also usually makes for the least expensive find. (Plus, it will be significantly lighter!) Those who attempt this type of construction must be comfortable drilling a hole between the inside & outside to add the probe & heating element. This will require the user being 100% certain there are no wires, coolant lines, or other hazards running near the drill location. With patience & a little electrical experience, we were able to utilize our commercial refrigerator's built-in circulation fan & light.
Thermostats
A thermostat is the most important component in ensuring an incubator's ability to hold an accurate & consistent temperature level. The species of animal you are planning on incubating will play the most important factor in determining which type of thermostat to rely on. For example, if you'll be incubating a species whose eggs can tolerate a few degrees variance, a super accurate thermostat is less important than it could be otherwise. Alternatively, if you were attempting to do something like "temp-sex" a Reptile at a very specific temperature, a higher degree of accuracy will be necessary. There are many brands & types of thermostats available, with the three most commonly used styles being mechanical, digital, and pulse proportional. Each type has it's benefits & disadvantages, and we'll cover each in detail below.
Mechanical/Analog Thermostats
A mechanical on/off thermostat is the most common type we see used with incubators, and accuracy can depend on the quality/brand of the unit. All mechanical thermostats have at least some degree of temperature swing, which is the variance in temperature between the thermostat turning the heating element on & off to maintain a roughly steady temperature. It's a little tough to describe, but check out the graphic (right) for a visual idea of what we're talking about.
Digital Thermostats
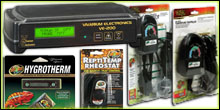
A digital on/off thermostat is another very popular thermostat used with incubators, and usually has slightly better accuracy than analog units of similar quality. With a digital LCD screen to select temperatures, these tend to make tweaking the temperature a little easier. In our experience, digital thermostats are usually a little more on the mark when comparing the thermostat's set temperature to a separate probe or infrared thermometer inside the incubator. There's still a little on/off temperature swing associated, but usually a little less than analog units. Many hobbyists confuse these with Pulse Proportional thermostats, however they are very different in terms of how they function. We've experimented with a horticultural digital thermostat, as well as a simple digital thermostat from Vivarium Electronics (VE100), and each maintains a fairly accurate temperature.
Pulse Proportional Thermostats
This type of thermostat is considered the most accurate & predictable in the hobby, due to how it gradually raises & lowers the power going to the heating element to maintain a steady temperature. That gradual power cycle repeated gives these thermostats their "pulse" title, and makes for the least noticeable temperature swing of any thermostat mentioned in this article. The graphic (right) is simplified for the purpose of a simple explanation, but should provide a basic understanding of the principal difference between this & an "On/Off" thermostat. Most high quality pulse proportional thermostats are able to keep temperatures within a fraction of a degree or so, which makes these the best choice for temperature sensitive, rare, or otherwise valuable species. In theory, the mild temperature swing will be almost completely minimized with the incubator (or enclosure) being well sealed. This type of thermostat must be used with dimmable heat sources only, and is perfect for use with devices like ceramic heat emitters, heat pads, heat tape, and heat cable.
Monitoring
As previously mentioned, conditions inside an incubator should be monitored by a separate thermometer, other than the temperature gauge of a thermostat. There are a few options to consider before moving forward, and we'll briefly touch on each of the common types of metering equipment used in the hobby below.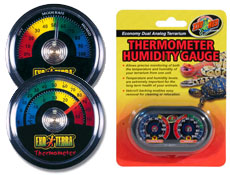
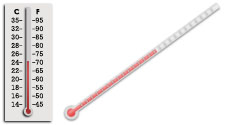
Mechanical/Analog Thermometers
In the herp hobby, analog thermometers & hygrometers are very commonly used for monitoring enclosure conditions. Their major benefit is price, since they are probably the cheapest option available for the purpose. One of the drawbacks is (unless you have a glass viewing area in your incubator), an analog meter will require opening the incubator, and exposing it to room temperature/humidity to check conditions within. We like to think analog thermometers usually provide a general idea within a degree or two of the temperature inside an enclosure. Having said that, if you've ever been to a pet store & seen these hanging on a sale rack, you may have noticed some of the thermometer dials indicate slightly different temperatures, despite being in the same exact location... Some brands are less accurate than others, but we don't recommend using any type of analog thermometer to measure critical temperatures in an incubator. Analog hygrometers can be a little more accurate by comparison, but commonly malfunction when used in enclosures that are misted often. (Once water gets inside an analog hygrometer, accuracy will be significantly affected) For incubators, there's less of an opportunity for moisture to get inside the hygrometer, since the incubator won't be misted. If you are working on a budget, and want a fair idea of what the relative humidity is inside your incubator, an analog hygrometer can get the job done.
Mechanical/Analog Thermometers
A high quality liquid filled thermometer is one of the more accurate types available, but it does have a couple drawbacks. First, they have a fairly slow response time compared to digital meters, and like the analog meters above, these will require you to open the incubator to check on temperatures. A less important issue is that they are often a little difficult to read, unless it's a metal/plastic backed model with clear markings. The longer the incubator is open, the bigger the temperature drop will be, so an easy-to-read model should be used for this purpose. If you decide to go this route, be sure to purchase either a full immersion or general use thermometer, as partial immersion thermometers will not be as accurate for this purpose. Due to the delicate nature of these, we don't recommend them for use inside an enclosure housing a live animal. With prices starting around $5 for an alcohol-filled lab thermometer, these can help keep your DIY incubator within budget.
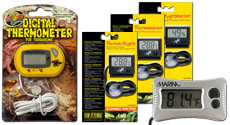
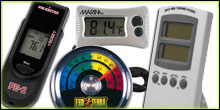
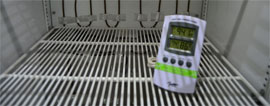
Digital Thermometers With or Without Probe
A digital meter has many benefits and few drawbacks. When equipped with an external probe, the meter can be read without opening the enclosure, which is ideal. Using a model without a probe will require opening the incubator to view conditions, unless you have a glass viewing panel on your incubator. Digital thermometer / hygrometer combo units are available, and most also keep track of high & low temperatures, which can come in handy. These are generally more accurate than analog units, easier to read than liquid-filled types, and make for an acceptable all-around solution in our experience. Even those working on a budget will like the price, as most models are around $19-35 for a fairly accurate solution to monitor both humidity & temperature. If your budget allows, certain ($110+) models can even connect via WIFI, and will record temperatures & send alerts to your cell or email if temperatures deviate from a specified range. That's a very useful tool for those working with sensitive species, but may be overkill for many hobbyist's purposes.
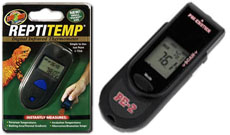
Infrared Thermometers
Infrared thermometers are the most useful & accurate way to instantly monitor the surface temperature of an egg incubation container (most commonly a deli cup or similar). These can be used in conjunction with another meter, as a backup method, and as a way to ensure accuracy. The only drawback is that it does require the user to open the incubator to check temperatures. Temperatures of different locations inside an incubator can be instantly monitored for comparison, which is useful to ensure eggs are evenly heated across the unit. (More of a benefit of larger incubators) At NEHERP, we use one of these in conjunction with a digital hygro/thermometer, and have had good luck doing so. Just keep an eye on your chosen meter's distance to spot ratio (D:S) when measuring temp, as more expensive meters can read from farther away, while less expensive meters will require the meter to be very close to the item being measured.
Heating Elements
There are a few options to consider when deciding on a heating element for your DIY incubator. Evenly distributing the heat is important, which makes the decision depend mostly on your incubator's size & orientation, but in this case, there are a handful of acceptable options. Placement of the heating element needs to account for where the incubation cups will be stored, to ensure some eggs won't overheat when the element is turned on by the thermostat. Adding a very large heating element to a very small incubator can make achieving an even temperature a little more difficult, and the same goes for when a very small element is used on a very large incubator. We'll discuss the differences & things to consider below.
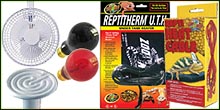
Heat Bulb / Ceramic Heat Emitter
This is an old school way to heat an incubator, but we've seen photos of a couple online still being built & used. While this will function, it's not a recommended option. The incubator will heat up drastically quicker nearest to the bulb, be more difficult to increase humidity, and are the least efficient of all the options. Above all, an enclosed heat bulb can be a fire hazard if not wired & installed properly. For just another few bucks, there are much better performing options.
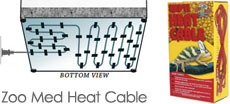
Heat Cable
We use Zoo Med heat cable in all of our custom incubators, and have had success doing so. A cable can be carefully affixed to the bottom and/or sides of an incubator using heat-safe tape, and when the lines are arranged properly, will provide a very even radiant heat. Most brands leave the first 6 feet of the cable unheated to allow for space between the wall outlet (or in this case, thermostat) and the enclosure it's heating. Incubating egg containers should be raised from being in direct contact with the cable, which can be done any number of ways. In our fridge example, we used the included adjustable shelves. Otherwise, egg crate or a similar material can be used for that purpose. Placing a small deli cup full of water with a hole in the lid inside the incubator, next to the egg incubating containers, will help keep humidity high to provide an ideal warm/humid environment for most eggs. (As the water is warmed, it will evaporate into the air) Plus, adding a small container of water will help keep temperatures stable, since water takes longer to heat & cool than the air around it. Heat cables are dimmable, and can be safely used with either traditional "on/off" or pulse proportional thermostats.
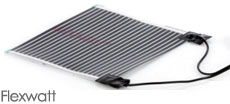
Heat Tape (Snake Rack Heaters)
Heat tape performs similar to heat cable for this purpose, and is a great choice for many hobbyists building a DIY incubator. It's more expensive than cable, but provides a little heavier-duty look, and a wider heat pattern. Usage advice is pretty much the same as heat cable, with incubating egg containers needing to be elevated from the tape itself. Like the other options mentioned, these are dimmable, and can be safely used with either traditional "on/off" or pulse proportional thermostats.
Preparing A DIY Incubator
Unless you are using a refrigerator as your incubator container, the act of actually setting up an incubator usually requires no special knowledge other than a basic understanding of how a thermostat works. Below, we'll go over some of the different techniques used when setting up an incubator, as well as a few things to avoid.Basic Construction
Regardless of the type of container is being used, it's critically important to ensure the incubator is well seaLED & insulated. Preventing airflow will do a whole lot towards our goal of keeping a nice, steady, predictable temperature. If there are small gaps or cracks in your incubation container, they can be filled with aquarium grade silicone. Not only is silicone incredibly heat resistant, it's also a water & air-tight sealant. Just be sure to allow it to fully cure before introducing anything to the incubator!Adding The Heating Element
 Two of the most common & recommended heating elements for DIY incubators are Heat Cable and Heat Tape. With either type, it's very important to follow the manufacturer's directions when setting up the incubator. The wiring hole necessary to attach the heat element can be sealed up fairly nicely after wiring is complete using a touch of aquarium grade silicone.
Adding The Thermometer
Whenever possible, we suggest using a probe style digital thermometer for this purpose. It's probe should be placed within the enclosure nearest to where the eggs will be incubated. The same rule applies to glass & analog thermometers, as well. If the incubation container is very tall, it may be worth adding two thermometers, to keep track of the hotter air near the top, as well as the cooler air near the bottom. If plumbing a thermometer's probe into the incubator, the hole in which the probe wire runs can be sealed up using silicone, after it's successfully added.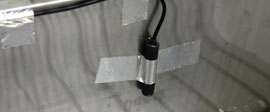
Adding The Thermostat's Probe
Placement of the thermostat's probe requires a little planning. Placing a probe too near to the top will see the hottest air as the heat source warms up, which may cause less than ideal performance. Alternatively, placing a probe too near to the heat source can cause rapid "on/off" cycling, due to the probe heating up very quickly every time the thermostat calls for heat. It's important to place the thermostat's probe nearest to where the egg container(s) will be placed during incubation, because that's where the temp will matter most. In larger incubators, placing the probe towards the center of the enclosure, halfway up from the bottom will help to get a fairly even measurement.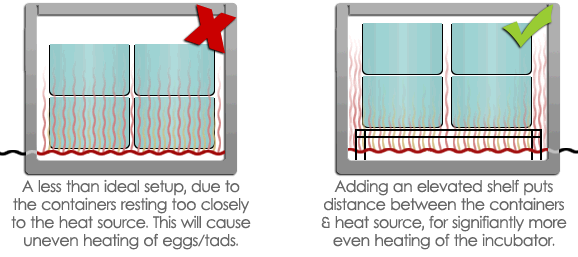
Container Placement
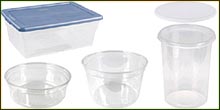
The majority of herp hobby incubators contain either deli cups, tupperware containers, petri dishes, or other types of small containers meant to hold the egg or tadpole being incubated. For most situations, a couple small holes are punched in this container to allow for a little airflow, and to prevent condensation. Placement of the containers can be critical, and care must be taken to ensure the incubator can heat up evenly. For this reason, we suggest using an elevated shelf (more than one on larger incubators) within the incubator, to add space for air circulation around, under, and between the containers. The shelf should be of a material which allows air to pass freely through it, like a plastic or metal mesh or grid. We've seen a lot of creative things used like light diffuser material, plastic fine chicken fencing, dish racks, and even those little metal wire shoe organizers. Tall incubators will benefit greatly from multiple levels when possible, but keep in mind there may be a slight temperature differential between the top & bottom levels.Wiring It Up & Turning It On
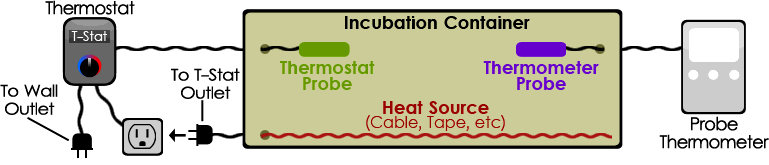
As illustrated above, wiring a basic incubator is very straightforward once the probes are in place. Simply plug the heat element into the thermostat's outlet, and the thermostat's plug into a wall socket. After that, set the temperature using the thermostat's dial (or buttons, depending on brand). After enough time goes by (we usually wait 1-2 hours at least), check the probe thermometer's reading for the actual temperature inside the enclosure, and adjust the thermostat's dial accordingly. Especially on inexpensive thermostats, the temperature dial may not always be incredibly accurate, so dialing it up or down depending on the probe thermometer's reading is very important to ensure accuracy. When possible (especially for new incubators), we suggest using two thermometers at first to be certain the temperature is in a safe range. Before introducing eggs, the incubator should be allowed to cycle empty for a day or two, to ensure temperatures are steadily kept where they should be.Modifying Humidity
Maintaining humidity depends a lot on environmental factors to consider, and every incubator performs a little differently. For that reason, it can be a little tricky to maintain the humidity right where we want it at first, but things get easier & quicker to address after getting used to the performance of the individual setup. As described earlier, we recommend using an accurate digital hygrometer to gauge relative humidity within the incubator or incubation container. If your species requires higher humidity, there are a few ways to go about this.Other Useful Info
Power Outage Damage Prevention
Because most incubators use fairly energy efficient heat sources, investing in a small office Uninterruptible Power Source